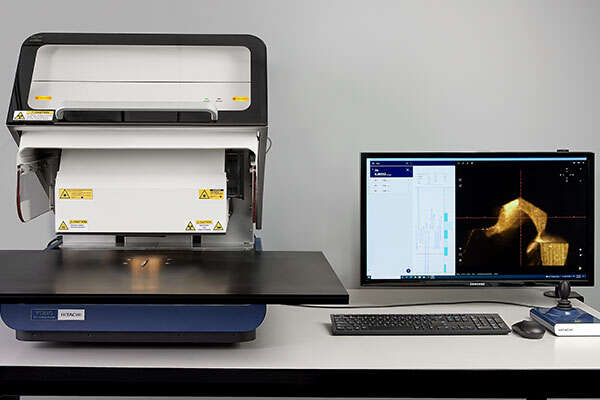
The FT230 XRF coatings analyzer is purpose-built for the specific needs of the coatings industry. Combining a new software interface and user experience features with high-end analytical components, the FT230 makes it easier to test higher volumes and free up operators to perform other tasks while the XRF is measuring. Here’s four new key features that will make your coatings analysis faster:

This XRF’s machine vision feature consolidates all the steps an operator needs to perform to setup an XRF measurement – finding measurement locations, choosing calibrations, selecting collimators and reporting the results – into one simple, automated routine. The operator places a part into the instrument, clicks the Find My PartTM button and the instrument loads the entire, prescribed analytical routine.
The operator only needs to confirm the identified part and the FT230 handles the rest, including sending the results to the right place or creating a full report for your customers. This frees up the operator to work on another instrument in the lab or return to the production floor. Find My PartTM can save your operators 72% (and sometimes more) of the time needed to set-up a complex measurement and makes it more likely to be right first time.
In addition to the machine vision capabilities, Find My PartTM also makes it easy to load a measurement routine using text search or scanning the QR or barcode from a traveler. For simpler setup where Find My PartTM isn’t needed, the FT230 has additional features that will benefit your operations by improving testing capacity and operator utilization.
When measuring multiple locations on a large sample, the operator typically needs to hunt for each location using the standard, narrow-field camera image. This view is intended for making small adjustments in final sample positioning; considering the small beam sizes of an XRF coatings analyzer, the view necessarily only shows the operator a limited area of the part.
The XRF coatings analyzer may have a way to make it easier to locate the first measurement location when the sample is placed into the instruments (e.g. a pre-positioning laser when the stage is ejected or a laser showing where the X-ray beam will be), but the operator is on their own after the first location. This can result in frustration and wasted time as the operator searches for the remaining points.
Our FT230 can be fitted with a second camera to see more of the sample chamber to simplify part set-up. To use the wide-view camera, the operator places the sample into the chamber and simply clicks a button in the software. Within a few seconds, the XRF collects a view of the stage area that can be analyzed and presents that image next to the narrow-field image.
The operator can zoom in on features in the wide-view image to read component labels and see more details to ensure they select the right area. The operator clicks on the desired feature shown in the wide-view image and that point is moved into position for analysis. The operator can then use the narrow-field image to make any desired final adjustments.
Benefits of using a wide-view camera
A simple experiment illustrates the benefits of using the wide-view camera. An automated, multipoint measurement program was created to measure a circuit board measuring 5.75” x 9.5”. The program was set up to measure 5 points – one in each corner and one in the middle of the board.
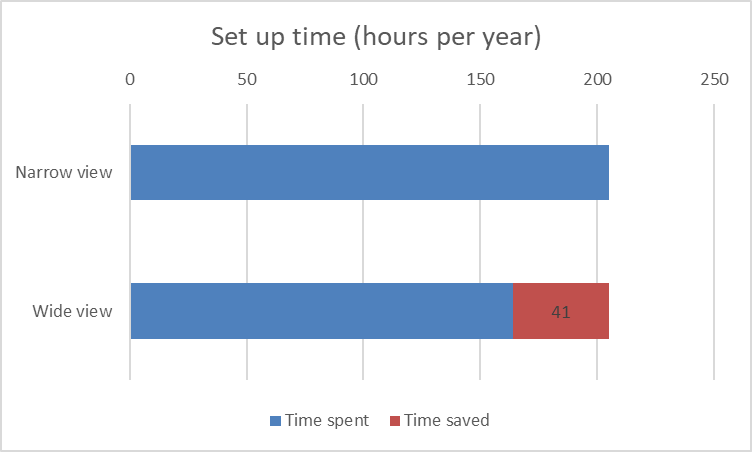
This was run by the same, trained operator in two ways: once using only the narrow-field camera and once using the wide-view camera. Since the measurement time is identical in either scenario, only the time to set up the program will be considered. The results are shown below.
Time to create a 5-point program using only the narrow-field camera: 73 seconds
Time to create a 5-point program using the wide-view camera: 59 seconds
Time savings: 14 seconds (20% savings)

At first glance, this may not seem like a lot of time, but it’s common in high-volume manufacturing facilities to test at least 50 boards a day like this. In one day, that adds up to more than 12 minutes where an operator could be free to perform other tasks.
Over the course of 200 days, using the wide-view camera can create over 40 hours, or 1 working week, of additional productivity for your XRF operator.
The wide-view camera can be combined with other features such as auto focus or auto approach to save additional time in getting samples ready for measurements.
To get consistent results from an XRF coatings analyzer, it’s best to keep the distance between the X-ray tube, part and detector the same for each measurement. This is because X-ray intensity is a function of distance and because changes to the tube-part-detector geometry affects thickness measurements. XRF coatings analyzers typically use one of two ways to retain this critical geometry – a focus laser or video focusing that evaluates image contrast.
The analyzer’s head (containing the X-ray tube and detector) moves up or down until the instrument’s focusing routine is complete, in some cases requiring the operator to make mild final adjustments. These routines take time to initialize, move and finalize. And may introduce errors if operators need to make decisions.
The FT230 can be fitted with a feature called auto approach that needs one click to bring the head to the right position. Sensors inside the instrument measure the distance to the sample. When auto approach is activated, the instrument compares that distance to the working distance (also known as focal distance) selected in the calibration and moves the head to that position. This provides the operator with confidence that the results will be accurate without spending time and possibly making a mistake in focusing the part.
Benefits of auto approach
A simple experiment illustrates the benefits of auto approach. Six parts of heights ranging 4.8 – 6.6” (1.9 – 2.6 cm) are loaded into the chamber. The operator creates a multipoint program to measure one location on each part.
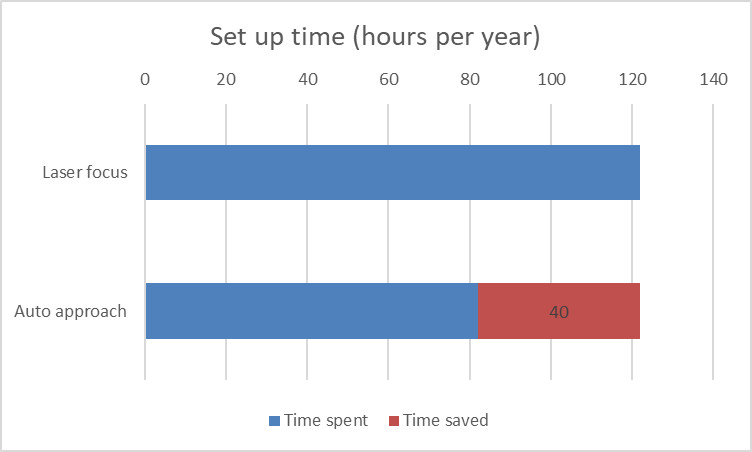
This was run by the same, trained operator in two ways: once using a focus laser (the head moves and the operator determines when the part is in focus) and once using auto approach (the head automatically moves to the correct focal distance without operator intervention). Since the measurement time is identical in either scenario, only the time to set up the program will be considered. The results are shown below.
Time to create a 6-point program using only the laser focus: 44 seconds
Time to create a 6-point program using auto approach: 29 seconds
Time savings: 15 seconds (33% savings)

This might not seem like a lot, but in the common situation where this exercise would be repeated 50 times each day, the operator can save 12 minutes and spend that time performing other tasks.
Over the course of 200 days, using auto approach can create nearly 40 hours, or nearly 1 working week, of additional productivity for your XRF operator.
Auto approach can be combined with other features such as a wide-view camera to save additional time in getting samples ready for measurements.
After positioning a part for measurement, the last step before pushing the start button is to focus the part. This is commonly achieved either with a focus laser or by using a routine that evaluates image contrast.
Using either method, the analyzer’s head containing the X-ray tube and detector moves up or down until the instrument’s focusing routine is complete, in some cases requiring the operator to make mild final adjustments. These routines take time to initialize, move and finalize and may introduce errors if operators need to make decision.
Our FT230 can be fitted with an auto focus feature that doesn’t need operator involvement and doesn’t move the analyzer’s head. While active, the camera automatically focuses on the part in the measurement crosshairs.
The routine even measures the distance to the part, which allows the operator to measure parts that have different heights or have stepped geometry. This is incredibly fast and allows for higher testing volumes while the operator spends less time setting up the parts.
Benefits of using auto focus
A simple experiment illustrates the benefits of using auto focus. Six parts of heights ranging 4.8 – 6.6” (1.9 – 2.6 cm) are loaded into the chamber. The operator creates a multipoint program to measure one location on each part.
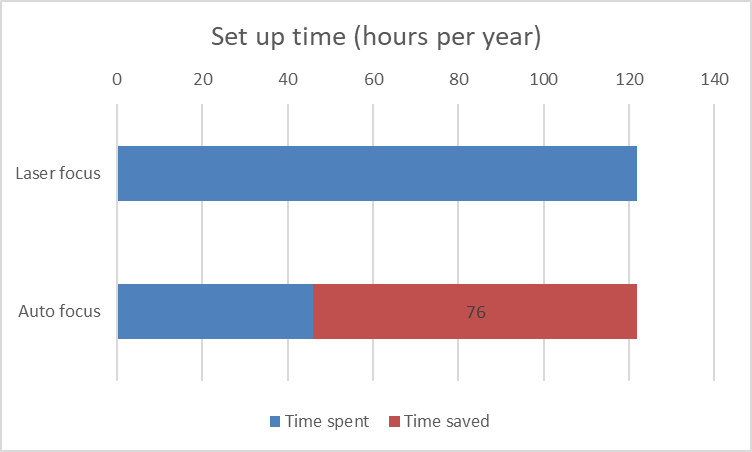
This was run by the same, trained operator in two ways: once using a focus laser (the head moves and the operator determines when the part is in focus) and once using auto focus (the head does not move and the operator has no input on the focusing). Since the measurement time is identical in either scenario, only the time to set up the program will be considered. The results are shown below.
Time to create a 6-point program using only the laser focus: 44 seconds
Time to create a 6-point program using auto focus: 17 seconds
Time savings: 27 seconds (62% savings)

This is nice savings for a single run, but consider that it’s common to setup at least 50 runs like this each day. In one day, that adds up to more than 22 minutes where an operator could be free to perform other tasks.
Over the course of 200 days, auto focus can create over 76 hours, or nearly 2 working weeks, of additional productivity for your XRF operator.
Auto focus can be combined with other features such as a wide-view camera to save additional time in getting samples ready for measurements.
The greater the range of part heights, the advantageous auto focus becomes because the operator spends less time making adjustments to the head position. Also, when using the focus laser, the range of part heights is limited by the working range, also known as focal distance. Using auto focus, the FT230 can measure parts that vary in height by up to 2.6” (67 mm).
Ready to find out more about the FT230 XRF coatings analyzer?
Discover more Book a demo
You might also be interested in: