Mikko Jarvikivi, Product Manager, shares his tips on how to get the best measurement with the Vulcan handheld laser analyser.
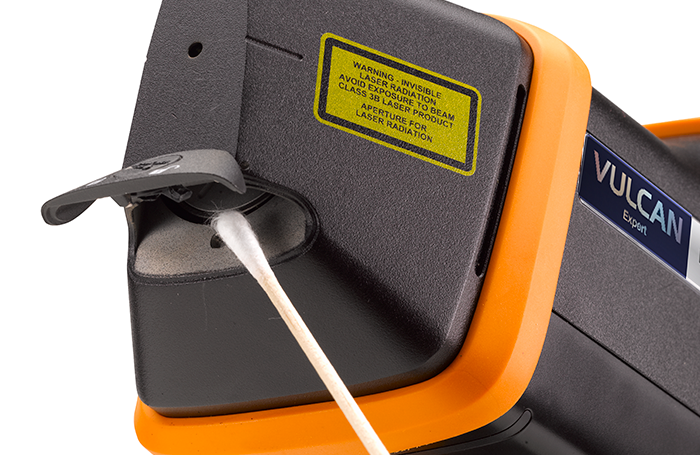
Even though the Vulcan’s measurement window is recessed and well protected, it’s essential that you clean the measurement window from dust and burn residue daily, or more if you are analysing large amounts of samples. Wipe the measurement window clean with the cotton buds that are supplied by opening the nose lid with tool provided. If the cotton bud doesn’t clean measurement window completely, dip a new one in pure ‘optical grade’ (99.5%) isopropanol and wipe again. Don’t use detergents or other alcohols to clean the window as this can leave a film on the window surface and compromise results.
Clean the camera window as well with a cotton bud at the same time.
Ensure the battery is fully charged. Charging the battery takes around 4-5 hours and you will get around 8-10 hours of battery life with typical usage. Measuring in cold or hot environment might slightly reduce battery life. Your Vulcan will come with two batteries to ensure no interruptions to your work routine.
It takes about 30 seconds for your Vulcan to turn on. Now is a good time to put your wrist strap on, this provides extra protection for the analyser.
You’ll need to put in your PIN code to access your Vulcan. The default PIN code is “1111”.
Remember to always wear laser safety goggles whilst operating a Class 3B laser. Pair of safety goggles is supplied with each instrument.
We always provide a certified check sample that you can use to verify performance. It’s good practice to verify performance every day. Store the check sample in a clean and dry environment and remove surface dirt before taking a measurement.
Place the analyser firmly against the sample so it’s in direct contact so there is no gap between the sample and analyser. Cover both the measurement window and proximity sensor window. The red indicator light will flash when the instrument is ready to take a measurement.
Pull the trigger and hold until you hear the ‘measurement complete’ sound. The result will show up on the screen. Check the grade ID and its chemistry, and compare them to the certificate. Typically the results should be within 5-10% of the certified values.
Make sure you move the analyser between measurements and avoid measuring exactly from the same location.
If you’ve not used a Vulcan before, find out more or contact us for a demo.
Learn more about Vulcan